You are here: Enrollments > Managing Enrollments > Adding Enrollments

Adding Enrollments

Once you have added learning events, you should add Enrollments to sign Users up (or enable them to sign themselves up) for them. For example, if you added a new Instructor Led Training (ILT) event, but did not add an Enrollment for it, the ILT event will appear on calendars, but Users will not be able to enroll or reserve seats. Once you have added an Enrollment for an event, you or other Administrators can manage the roster and wait list. You can add Enrollments for:

  • ILT Sessions
  • Virtual ILT Sessions
  • Online Courses
  • Assessment Instances
  • Classes
  • Self Study
  • Online Synchronous Courses
  • Chat Rooms
  • LearnCenters
  • Forums
If you intend to attach files to an Enrollment, you must first upload them to the Resource Manager.

On the ControlPanel:

  1. Click   on the Enrollments menu to expand it.
  2. Click Enrollments.
  3. Click Add Enrollment.
  4. Select one of the following from the Event drop-down list: 

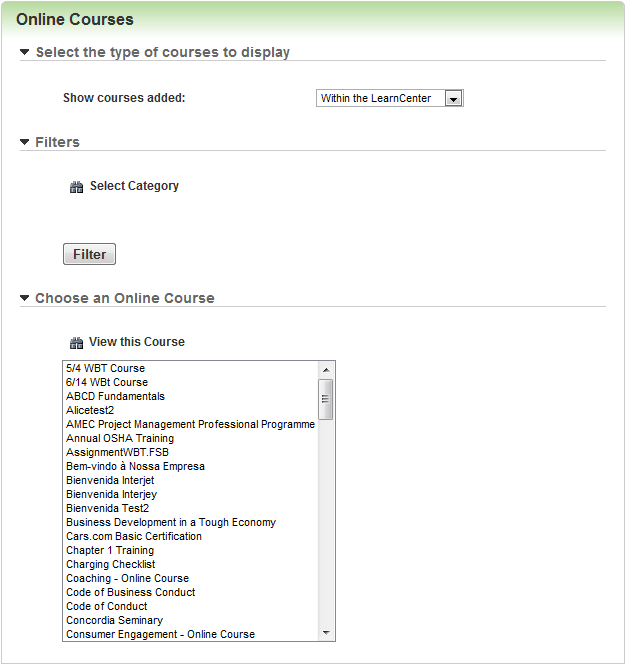
A pop-up window opens that corresponds to the item you selected. In the example above, the User selected Instructor Led Training Session from the Events drop-down list.

  1. Select the event you want from that window and click Return Selected. Basic information for the event you select, such as the Event Name and Event Description, display on the Add Enrollment page.

Depending on what you selected, different fields display on the page. Not all of the following steps may be applicable to your situation. 

  1. Select the date and time the Event Starts.
  2. Select the This event does not end check box if there is no end to the event. (Default)
    or
    Clear the check box to indicate that there is an ending date for the event. If you clear this check box, the Event Ends fields become visible. Select an ending date for the event.
The Event Ends date must be later than the Event Starts date.
  1. Type the Enrollment Name and Enrollment Description. By default, these fields are automatically populated with the Event Name and Description. You may want to use these fields to provide company-specific information. The maximum number of characters for an Enrollment name is 300. The maximum number of characters for Enrollment description is 3000.
  2. Select the dates and times the registration for the Enrollment Opens, Closes, and becomes Visible. For communication messages associated with Enrollments for which Users self-enroll (approval, nomination, etc.) the time is converted to the Users’ time zone with their time zone designator.

    Click the Use Event’s Time Zone Settings check box to use the learning event’s time zone settings to display open and closed Enrollments and visible dates. (Default)
    or
    Clear the check box to select additional options for the time zone.

If you clear the Use Event's Time Zone Settings check box, the Time Zone drop-down list, Observes Daylight Savings Time check box, and the Always Show This Time Zone check box displays. The following rules apply for Enrollments:

  • If the Always Show This Time Zone check box is selected for both Enrollments and its event, for example ILT Session, the system displays event dates in ILT Session’s time zone and Enrollment Dates in Enrollments time zone.
  • If the Always Show This Time Zone check box is selected for Enrollments but not selected for its event, for example ILT Session, the system displays event dates in User's time zone and Enrollment Dates in Enrollment's time zone.
  • If the Always Show This Time Zone check box is not selected for Enrollments but selected for its event, for example ILT Session, the system displays event dates in ILT Session’s time zone and Enrollment Dates in User's time zone.
  • If the Always Show This Time Zone check box is not selected for both Enrollments and its event, for example ILT Session, the system displays event dates and Enrollment dates in User's time zone.

ILT and VILT Enrollments automatically inherit time zone properties from the ILT session or VILT event. Dynamic object views for Enrollments display Users' time zones in addition to the ILT session start and end time. When you update an ILT session's time zone because you added a new or changed the existing physical location, the time zone for any associated Enrollments updates automatically.

See Adding New ILT Sessions for additional information on the Always Show This Time Zone check box.

  1. If you want to assign the Users a default post Enrollment status:

or

If you do not want to assign a Default Post Enrollment Status, clear the check box.

Default post Enrollments for Users are determined as follows:

  • If the Default Post Enrollment Status is specified for Enrollment, then this will be the default post Enrollment status.
  • If the Default Post Enrollment Status LearnCenter registry key is specified, then this will be the default post Enrollment status.
  • If the Enrollment type is Course, Class, LearnCenter or Assessment, the Default Post Enrollment Status will be Incomplete. Otherwise it is considered Complete.

If you later assign or change the post-status, the change only affects newly approved Users going forward, not those approved prior to the change.

For example: An Admin adds an Enrollment, but does not set the default post-status. John enrolls and is approved for the Enrollment. Because the Enrollment has no default post-status setting, John receives the default post-status of Completed. Jane also enrolls for Enrollment, but she is not approved right away. The next day, an Enrollment administrator changes the default post-status to incomplete. John’s post-status does not update to reflect the change. Jane is later approved after the default post-status setting is changed. Her default post-status is Incomplete because the setting is forward only and set to occur upon approval into the Enrollment.

Irrespective of Default Post Enrollment Status for types Course, Class, LearnCenter or Assessment, the post status will be changed to Complete once the event has been completed.
  1. Type the Minimum Seats and Maximum Seats available for the Enrollment.
  1. Select one of the following for Waitlist:
  1. Select the Require Supervisor Approval check box if you want to require that supervisors approve the Enrollment of the student. When Users enroll, they will be listed as “Nominated” and you will have to manually change their status to approved once the supervisor approves them. If you select this option, the Require Supervisor to register in the LearnCenter check box displays.
    or
    Clear the check box to enable open Enrollment. (Default)
The Supervisor Approval communication message is configurable. Depending on how the Supervisor Approval communication message is set up, the approval request is sent to the appropriate parties. If a User has more than one supervisor, based on how the message is configured it is possible that all supervisors might receive the message. The first supervisor to approve or deny the Enrollment request provides the "official response". If later another supervisor attempt to approve or deny, they will receive a message stating that the Enrollment request has already been approved or rejected. See Enrollment Communication Messages.
  1. Click the Require Supervisor to register in the LearnCenter check box to indicate that you want supervisors to register as members of the current LearnCenter before they can approve their direct reports’ requests for training. This check box only displays if you selected the Require Supervisor Approval check box.
    or
    Clear the check box to indicate that you do not want supervisors to register as members of the current LearnCenter before they can approve their direct reports’ requests for training. (Default)
  2. Select the Notify supervisors when a user completes this enrollment check box to have a message sent to supervisors when their Users complete the event.
    or
    Clear the check box if you do not want supervisors notified.
  3. Select the Automatically approve all users who sign up for this enrollment check box if you want Enrollment automatically approved for each student.
    or
    Clear the check box if you do not want students automatically approved.
  4. Select the Allow users to drop this enrollment check box if you want to allow students to drop the class. (Default)
    or
    Clear the check box if you do not want students dropping the class once enrolled.
  5. Select the Allow Enrollment Administrators to Enroll check box if you want to allow Enrollment Administrators can enroll in their own Enrollments. When selected, this option allows Administrators to see the Enroll button on Enrollments. This is option is available for all Enrollment types except Virtual Instructor Led Training (VILT). If an Administrator needs to enroll in a Virtual ILT Enrollment, they can be added through the Enrollment User page.
    or
    Clear the check box to prevent Enrollment Administrators from enrolling in their own Enrollments.
  6. Select the Allow users to view this enrollment in their calendar check box if you want this Enrollment to appear in student calendars. (Default)
    or
    Clear the check box if you do not want students to view the Enrollment in their calendars.
  7. Click the Check for previous course or class completions by enrolled user check box to indicate you want LearnCenter to use Users' previous post Enrollment status for online courses or classes if there is no default post Enrollment set on the Edit Enrollments page or LearnCenter registry. This means if you have not determined a post status elsewhere, LearnCenter looks to the last course a User completed and uses that post status for this Enrollment.
    or
    Clear the check box to indicate you do not want to use Users' previous post Enrollment status for online courses if there is no default post Enrollment set on the Edit Enrollments page or LearnCenter registry. The post Enrollment status defaults to Not Attempted. (Default)
CollapsedClick here for information regarding Multiple Attempts
  1. (Optional) Click to expand the Standard Field Properties section view additional information.
  2. Edit the information as necessary.
  3. Click Select Users to add Users to the Enrollment.

All Users added to Virtual ILT Enrollments are automatically added to the WebEx, Live Meeting, Centra, iLinc, or Interwise sessions as participants. See Virtual ILT for more information on setting up Virtual ILT events.
  1. Click Select Administrators to add administrators to the Enrollment. Select administrators if you want to give other Users the ability to manage the Enrollment. These Users can edit group permissions, the roster, status of Users, and Enrollment communication messages.
All Administrators added to Virtual ILT Enrollments are automatically added to the WebEx, Live Meeting, Centra, iLinc, or Interwise sessions as presenters. See Enabling Virtual ILT and Integrating with a VILT Provider for more information.
  1. Click Select Categories, and select the categories you want to map to the Enrollment.
  2. Click Return Selected.
  3. Select the option button beneath the file you want to attach to the Enrollment.
  4. (Optional) Click to expand the File Attachments section, and then click Insert From Resource Manager. The Resource Manager opens and you can select a file to attach to the Enrollment. Select the option button beneath the file you want to attach to the Enrollment. Click Return Selected.

  1. Click the Before check box to show Enrollment attachments to Users before they enroll. A clip icon will display to Users indicating that there are files they can view.
    or
    Clear the check box to prevent Users from seeing the attachment before they enroll. (Default)
  2. Click the After check box to show Enrollment attachments to Users after they enroll. A clip icon will display to Users indicating that there are files they can view. (Default)
    or
    Clear the check box to prevent Users from seeing the attachment after they enroll.
If you selected either the Before or After check boxes, a clip icon displays to Users on the Control Center page, the Enrollment View dynamic content object (added by the dynamic content object wizard), and the Administrator section of the Enrollments for Current User dynamic content object (your Enrollments). This icon indicates that there is a file associated with the Enrollment.
  1. Click Save. A message pops up asking you if you want to insert yourself as an administrator for the Enrollment.
  2. Click Yes to add yourself as an administrator.
    or
    Click No if you do not want to add yourself as an administrator.

Depending on the type of Enrollment you are creating, additional sections may display on the page that enable you to:

  1. View Credits associated with the Enrollment
  2. View an Enrollment's Mapped User Assessment
  3. Add Recurrences for the Enrollment

Related Topics IconRelated Topics


Copyright © 2010-2015, Oracle and/or its affiliates. All rights reserved.